Generating the best AI Deskpad Image for Us To Print
What if a crisp design still looks wrong because its proportions don’t match the mat? Getting started with how to upload artwork for custom desk mat printing means considering the shape of the finished surface, not just the image file. A design made for a square canvas can end up awkwardly cropped or stretched across a wide desk mat.
It’s a common concern when you’re unsure whether your file is sharp enough or which details might sit too close to the edge. This guide shows you how to prepare artwork for Garage Print’s 90cm × 40cm or 61cm × 35cm desk mats, from matching the canvas proportions to checking image quality and layout. You’ll learn what to look for in pixel-based images and vector artwork, how to review the upload preview, and what to check before submitting your order. A few careful checks can help your design look balanced on screen and ready for print.
Key Takeaways
- Learn how to upload artwork for custom desk mat printing with a clear sequence, from choosing your mat to submitting your design.
- Prepare an artwork file that suits the selected mat and follow the upload form’s file guidance.
- Check the preview for unexpected cropping, awkward borders and colour differences before placing your order.
- Keep important text and design details away from the edges so they have enough visual space.
- Use the final checklist to prepare artwork for Garage Print’s 90cm × 40cm and 61cm × 35cm custom desk mats.
How to Upload Artwork for a Custom Desk Mat: Start with the Right Canvas
Match your artwork canvas to the proportions of your chosen desk mat before uploading. This helps preserve the composition and reduces the chance of a subject being cropped, stretched or surrounded by unintended empty space.
Garage Print’s custom desk mats come in two formats: 90cm × 40cm and 61cm × 35cm. Treat them as different design canvases, not interchangeable sizes. Centimetres describe the finished mat, while pixels describe the amount of image detail in your file. Understanding both helps you prepare artwork that fits the mat and retains its clarity. For a plain-language explanation of pixels and image resolution, see the linked reference.
Choose your desk mat dimensions before editing
The 90cm × 40cm mat has a wider, more panoramic shape than the 61cm × 35cm mat. Choose the size that suits your setup, then decide where the main subject should sit: in the centre, towards one side, or spread across the design. Leave enough room for the composition to feel balanced within that shape. For more help choosing the larger format, read the 90cm × 40cm custom desk mat guide.
Set up the artwork canvas without stretching the design
An aspect ratio is the relationship between an image’s width and height. Changing that relationship to fit a different canvas can crop or stretch the design, or leave empty areas around it. Keep the original artwork intact and make a separate print-ready copy. Adjust the copy’s canvas, then reposition or extend the composition instead of pulling the image out of shape.
For example, artwork composed for a wide 90cm × 40cm layout won’t automatically fill a 61cm × 35cm canvas in the same way. You may need to reposition the subject or extend the background to suit the new proportions. Check the design across the full canvas, not just as a thumbnail.
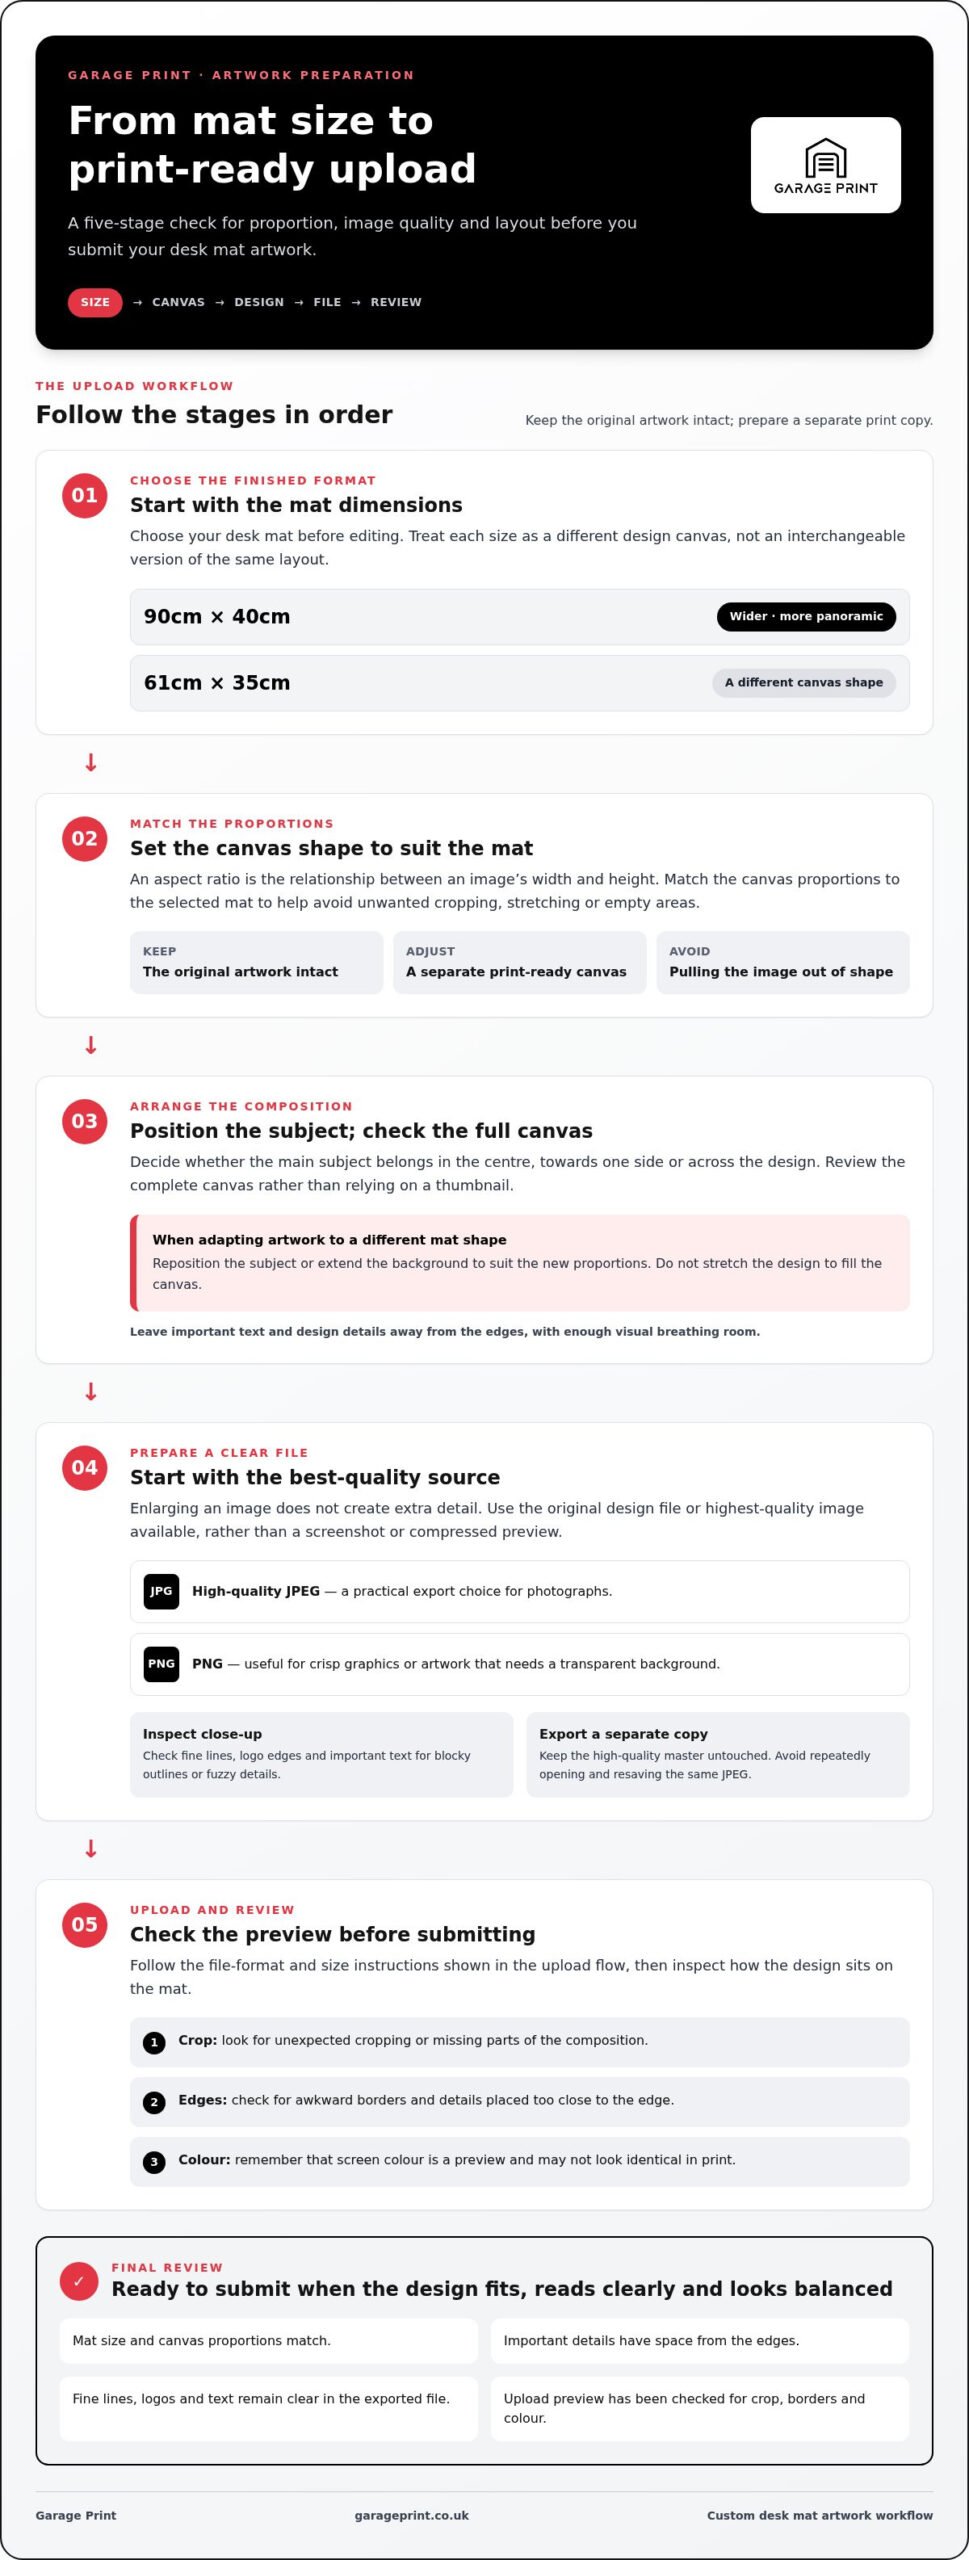
Use this quick workflow to get from size choice to upload:
- Select the mat size. Choose 90cm × 40cm or 61cm × 35cm before editing.
- Set the canvas shape. Match its width-to-height proportions to your chosen mat.
- Arrange the design. Position the main subject and check that the composition feels balanced.
- Save a separate copy. Keep your original artwork untouched and prepare a dedicated version for printing.
- Open the upload tool. Follow the file-format and size instructions shown during upload.
That’s the foundation of how to upload artwork for custom desk mat printing with confidence: choose the physical format first, then prepare a canvas that suits its proportions. Next, make sure the artwork has enough detail to reproduce clearly.
Prepare a Sharp Artwork File for Custom Desk Mat Printing
A design can look crisp on a phone and still lose definition when enlarged across a desk mat. Increasing an image’s displayed size doesn’t create extra detail, so fine edges can soften and small text may become difficult to read. Start with the best-quality version of your artwork, rather than a screenshot or a compressed preview saved from a website or messaging app.
Check image resolution and visible detail
Resolution describes how image pixels are distributed across a physical area, commonly expressed as pixels per inch (PPI). Pixel dimensions tell you how much source detail the image contains, while the chosen print size determines how large that detail must appear. A small file may look sharp on a mobile screen because it’s displayed at a compact size, but show visible pixelation when enlarged to mat scale.
Before uploading, zoom in on the parts that need to print clearly: thin lines, logo edges and important text. Look for blocky outlines, fuzzy lettering or details that have already blurred into the background. If flaws are visible in the source artwork, enlarging it is unlikely to restore them. Use the original design file or the highest-quality image you have.
Choose and export a suitable artwork file
For photographs, a high-quality JPEG is a practical export choice. PNG can be useful for crisp graphics or artwork that needs a transparent background. Follow the file-format and size instructions in the upload flow when preparing your file.
Keep a high-quality master file untouched, then export a separate copy to upload. JPEG compression can discard image information, and repeated saves may introduce visible artefacts around sharp edges or text. Avoid opening and resaving the same JPEG repeatedly. Return to the master when you need to make changes, then create a fresh export. For artwork with fine detail, inspect the exported copy itself, not just the design as it appears in your editing software.
Quick file check:
- Use the original artwork or highest-quality source available.
- Inspect fine lines, logos and text at close range.
- Save a separate upload copy and avoid repeated lossy exports.
- Follow the format and file-size instructions shown during upload.
These checks make the file-preparation part of how to upload artwork for custom desk mat printing more straightforward. Once your artwork is ready, explore custom desk mat options and carry those checks into the upload stage.
Prevent Cropping, Awkward Borders and Colour Surprises
A correctly proportioned canvas is a strong start, but the final layout still needs a close visual check. Text, logos and focal details placed at the edge can feel cramped or risk being trimmed. Screen colour is a preview, not a guarantee that printed colours will look identical. Inspect both the artwork and upload preview carefully before submitting.
Keep important artwork clear of the edges
Give key elements visual breathing room. A logo or line of text pressed against the edge can look unbalanced even if it remains intact. Details close to the edge may also be vulnerable to cropping or trimming. Avoid relying on a precise safe-area or bleed measurement unless it’s provided in the production instructions. Position essential content with comfortable space around it.
| Layout issue | Likely cause | Practical check |
|---|---|---|
| Text or a logo feels cramped | Important content sits too close to the canvas edge | Move it inwards and review the spacing on every side |
| Artwork appears cropped | The composition doesn’t fully suit the selected mat shape | Check that the subject and other essential details remain visible in the preview |
| An unexpected border appears | The artwork doesn’t fill the canvas evenly | Look around all four edges for gaps or unintended empty space |
| Colours seem different on screen | Display brightness, room lighting or colour handling affects what you see | Review the design in neutral lighting and follow the colour guidance in the upload flow |
Review colour, contrast and fine details
A bright monitor can make colours look more vivid than they appear in a normally lit room. Surrounding light and screen settings can also change how you perceive a shade. Treat the on-screen image as a useful reference, not an exact promise of printed colour. Colour spaces such as sRGB are a general consideration in digital artwork, so follow the colour guidance shown during upload.
Check readability across the full layout. Text should stand apart clearly from its background, and fine lines should remain visible rather than disappearing into nearby colours. Then inspect the preview for changes to positioning, cropping or borders. Review the design as displayed before submitting.
This final visual pass is a valuable part of how to upload artwork for custom desk mat printing. Check the edges, the balance of the composition and the contrast of important details before moving on.
Upload and Review Your Custom Desk Mat Artwork Step by Step
A careful upload is more than attaching a file. Choose the right mat, use the prepared artwork, then check the displayed result before submitting. The visual review helps catch layout problems; the upload instructions explain the technical requirements. Keep those checks separate, and remember that a preview cannot guarantee an exact printed colour match.
Follow the upload flow and inspect the preview
Use this sequence to move from your finished design to a considered submission. Follow the on-screen instructions at each stage for file types, file size and previewing your artwork.
- Choose your desk mat. Select the intended size before attaching artwork, so you’re reviewing the design against the right format.
- Prepare the final file. Check that it’s the correct version, has the proportions you want and follows the file-format and size instructions shown during upload.
- Upload the artwork. Select the prepared file and follow the instructions displayed in the upload flow.
- Review the result. Check the orientation, complete artwork, text, borders, cropping and overall balance in the preview. Make sure the design hasn’t shifted or been cut off.
- Submit the order. Once the layout looks right and the file meets the upload requirements, complete your submission.
Use the preview as a layout check, not a colour proof. Screen brightness and display settings affect how shades appear, so an on-screen preview can’t guarantee an identical printed appearance. It’s still useful for spotting misplaced text, awkward spacing or an unexpected crop before you proceed.
Fix common upload problems before submitting
If the uploaded result looks blurry, return to the original high-quality artwork rather than enlarging a small or compressed copy. If the composition is unexpectedly cropped, adjust the canvas or reposition the design in your editing file, then upload the revised version. Don’t try to correct a poor fit by stretching the artwork, as this can distort its proportions.
If transparency is missing or colours have changed, open the exported file in an image editor and compare it with your master artwork. Check that the background and colour appearance are as intended, then export a fresh copy using the upload instructions. Review the new result before submitting.
That’s the practical core of how to upload artwork for custom desk mat printing: follow the file instructions, then inspect the composition with care. Explore Garage Print custom desk mats and prepare your design for the size you choose.
Make Your Artwork Ready for a Garage Print Custom Desk Mat
A strong custom desk mat design comes down to a few careful decisions: choose the mat format first, prepare a clear source file, balance the composition and inspect the upload preview before submitting. Each check helps catch a different problem, from soft detail in the image to text sitting too close to the edge. Review the whole design, not just the central artwork.
Use a final artwork checklist before placing your order
Before you submit your design for a Garage Print custom desk mat, run through this checklist:
- Confirm the size and canvas shape. Check that your artwork’s proportions suit the selected 90cm × 40cm or 61cm × 35cm mat.
- Inspect the source file. Make sure the artwork looks clear, especially around fine lines, logos and text. Use the best-quality original available rather than a small, compressed copy.
- Check the composition. Keep essential content visible and give important details enough space from the edges to feel comfortable within the layout.
- Review the final upload preview. Check the orientation, crop, borders, text placement and overall balance. Treat the preview as a layout check, not a guarantee of exact printed colour.
- Follow the upload instructions. Use the file-format and size guidance displayed in the upload flow rather than relying on assumptions.
If anything looks wrong, pause and correct the artwork file before continuing. A preview can help reveal layout issues, but it can’t add missing detail to a low-quality image or restore parts already cropped from the source. Make changes in your artwork editor, export a fresh copy and review the updated result.
Choose a custom mat size that suits the artwork
Let the composition help guide your choice between the two desk-mat formats. A panoramic scene or design with elements spread across a wide field may sit naturally on the 90cm × 40cm mat. A more compact arrangement may suit the 61cm × 35cm format better. The aim isn’t to force artwork into a shape; it’s to choose a canvas that lets the subject, spacing and supporting details work together.
This final pass brings the key parts of how to upload artwork for custom desk mat printing together: a suitable canvas, a sharp source file, a balanced layout and a careful review. When you’re ready to choose a format for your design, Explore custom desk mats.
Get Your Artwork Ready to Make the Most of Your Desk Mat
A sharp custom desk mat design starts with the right canvas proportions, a high-quality source file and a balanced layout. Before submitting, check that important details remain clear and visible, then inspect the upload preview for orientation, cropping, borders and overall placement. That’s the practical heart of how to upload artwork for custom desk mat printing with confidence.
Garage Print’s custom desk mats are available in 90cm × 40cm and 61cm × 35cm sizes, with UK domestic delivery for customers across Great Britain.
Ready to choose a size and bring your design together? Explore Garage Print custom desk mats and prepare your artwork with care. A few thoughtful checks can help your design look balanced and ready for print.
Frequently Asked Questions
What file format should I use for custom desk mat artwork?
Follow the file-format instructions shown during upload. JPEG is commonly used for photographs, while PNG can suit crisp graphics or artwork that needs transparency. Keep a high-quality master file and export a separate copy. Avoid repeated JPEG saves, which can reduce image quality.
How large should my artwork file be for a desk mat?
There isn’t a single pixel dimension that suits every design. The required detail depends on the image and how large it will appear on the finished mat, so follow the upload instructions for any specific file-size or image requirements. Start with the highest-quality original available rather than enlarging a small copy. Remember that centimetres describe the physical mat, while pixels describe the image detail in your artwork file.
Can I upload a phone photo for a custom desk mat?
A phone photo may work if the original image is clear and detailed enough for the chosen mat size. Use the full-quality photo from your camera roll, not a screenshot, thumbnail or version compressed by a messaging app. Zoom in on the subject’s edges and fine details before uploading. If the image already looks soft or pixelated on screen, enlarging it is unlikely to restore the missing detail.
How do I stop my desk mat artwork being cropped?
Set up your artwork canvas to suit the proportions of the chosen mat, then check the whole composition in the upload preview. Keep text, logos and other essential details away from the canvas edges, where they may feel cramped or be vulnerable to trimming. If the preview shows an unwanted crop, adjust the canvas or reposition the artwork in your editing file before uploading the revised version.
Can I use artwork made in Canva or Photoshop?
You can prepare artwork in Canva or Photoshop, then export it in a format that follows the upload instructions. Check that the exported file matches your intended mat proportions and that text, transparency and fine details appear as expected. Keep your editable design or master file so you can make changes without degrading the original.
Will the printed colours look exactly like they do on my screen?
Not necessarily. A screen preview is a useful reference, but it can’t guarantee an identical printed appearance. Monitor brightness, display settings and surrounding light can all affect how you perceive colour. Colour spaces such as sRGB are a general consideration for digital artwork, so follow any colour guidance shown during upload. Check contrast too, especially where text sits over a coloured or detailed background.
What should I check before submitting my custom desk mat artwork?
Confirm that your chosen mat size and artwork proportions match, then inspect the source file for sharp detail and clear text. Check that essential content is visible and comfortably spaced from the edges. Review the final upload preview for orientation, crop, borders and overall balance. When preparing artwork for custom desk mat printing, follow the upload flow’s file-format and size instructions before submitting.